Blog Menu
Scriptorium : Glissandos II
Scriptorium : Glissandos II
By Dan Powell | 10.11.2017

This is an update to the original Glissandos script included in Scriptorium 10 years ago.
Steve Tavaglione got in touch asking if it was possible to set the length of a glissando precisely, in bars or seconds, and then have the glissando end on specific pitches. So we ended up turning the original glissando approach on it’s head, and targeting the played notes rather than starting from the played notes.
This means that the glissando will end it’s glide on the note you play. I call this “Destination Mode”.
In Destination Mode you can set the length of the glissando in Beats or Seconds, and the pitch distance (in semitones) from which to start the glissando.
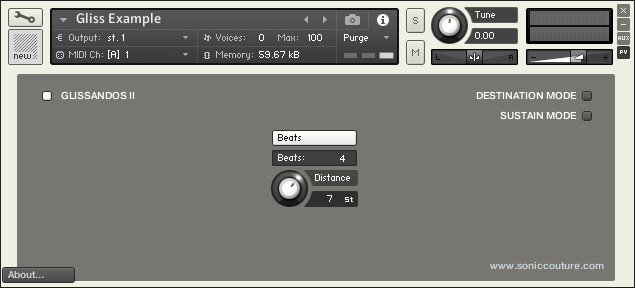
The original method is still included as an option, you can choose with the switch at the top right. Origin Mode is the original method in which we start the glissando from the played notes and slide infinitely away from that at a variable rate.
The “Sustain Mode” option also at the top right simply tells the glissando algorithm to either respond to or to ignore the sustain pedal.
DOWNLOAD:
You can download the script here:
Works with Kontakt 5.6.8 or later.
Close CloseScriptorium : Euphony
Scriptorium : Euphony
By Dan Powell | 16.05.2014
This script has been festering on my hard drive for years, so I thought it was about time to release it into the wild. It’s a harmonizer script that adds voices to an input melody. You can limit the harmonizations to a key or a chord so that the result is somewhat harmonious.
Read MoreIn my mind this is very useful for creating a certain kind of static harmony that I sometimes hear in Arvo Part or old Jon Hassell records… that is the harmony doesn’t really move around much, but just supports the melody in a very direct way. Have a listen to this Euphony demo from EVI maestro Judd Miller:
There are a lot of controls, but each is just a “voice” repeated. The panel is organized into 6 main columns in the top, each of which represents a harmonic ‘voice’. The leftmost column is your played INPUT voice, so this has slightly less controls than the others.
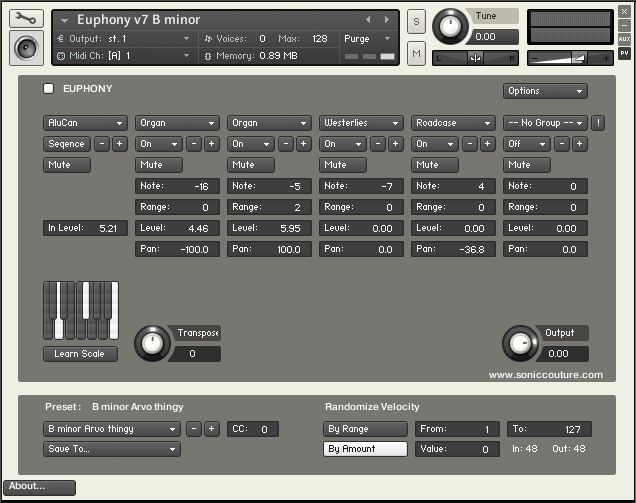
For each voice, at the top there is a menu that selects the Group. I like to use this with lots of different timbres on different groups, but you can set them all to the same group if you like. Below that, on the second row, you can turn the voice ON or OFF or into ROTATE mode. If it’s off the voice won’t sound. If a voice is in Rotate mode it will take turns, round robin fashion, with any other voices that are also in Rotate mode.
The little plus and minus buttons on the second row just increment or decrement the group.
The third row is Mute buttons, you can guess what those do.
Then for each voice you can set the Note (which is an offset from the input note), a Range (which is a random amount added to Note), as well as the Level and Pan of the voice.
In the middle far left there is a small keyboard that gives you a pitch set which restricts the movement of the harmony. It DOESN’T restrict your input playing though. And then there is a master Transpose and Output volume.
In the very bottom you have the preset management system and a random velocity tool. You can name/store up to 64 presets within the script, and you can export and import those using the Options menu at the top right.
DOWNLOAD:
You can download the script here:
Works with Kontakt 5.1 or later.
Many thanks to the wonderful Judd Miller, who provided endless ideas and feedback for this script as well as some sublime performances.
Close CloseScriptorium : Multi-Drum Split (Prepared Kontakt)
Scriptorium : Multi-Drum Split (Prepared Kontakt)
By Dan Powell | 24.03.2014
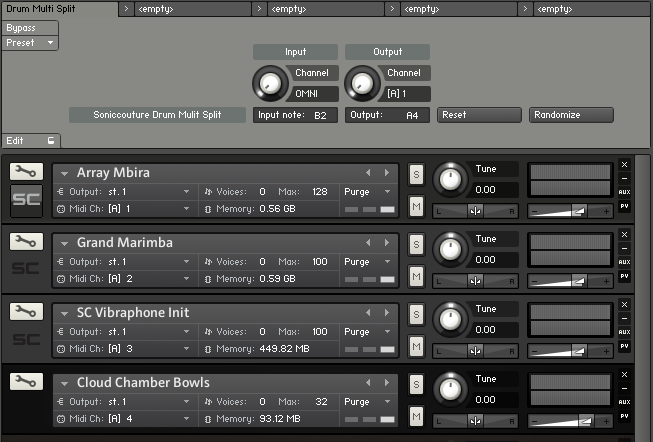
In the post about Keyboard Split I mentioned that the same script could be edited to enable every input note to have a it’s own output channel and MIDI note. Nobody took up the challenge, but a couple of people wrote with ideas about how that should be done, so here’s the version I’ve made.
Read MoreThe original idea was that this would be useful for building large multi-channel drum kits, since each note can be sent to any channel or output note. But it’s also interesting with pitched instruments to build up prepared-piano-type patch ideas in which each note has a different sound.
Here’s a video made using ten instruments and a randomly generated note assignment, resulting in a kind of Prepared Kontakt:
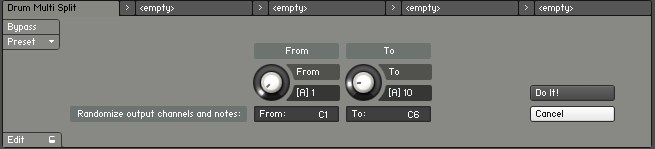
On the script panel you can set the input channel to OMNI or else select a single input channel if necessary. The Output Channel and Output Note can be set independently for all Input Notes.
If you hold down ALT when you adjust the Output Channel, all the notes will have the same Output Channel. If you click Reset, all the notes will be set to the input note, a kind of default map.
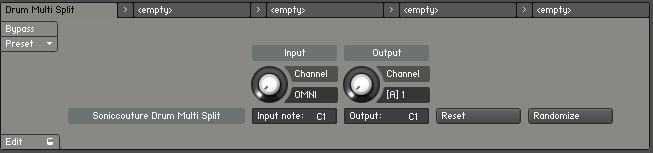
If you click Randomize you’ll see another page with some parameters for randomising the setup. Here you can set the From and To limits for the Channel, as well as the From and To limits for the Notes to Randomise. Using this carefully you can safely randomise just a section of your setup, even if you’ve edited another part of the keyboard by hand already. You have the option to Cancel, or else “Do It!”, after which you’ll be returned to the main page.
The script will be saved with a Multi, so save your Multis to save your setups. It may be quicker to replace instruments in a multi than to carefully arrange a pattern of note/channel routings with the script.
Thanks to Jörg Schwickerath and Christopher Merritt for their input and feedback.
Works with Kontakt 4.2.4 or later.
Close CloseScriptorium : Binaural Beats II
Scriptorium : Binaural Beats II
By Dan Powell | 13.02.2014
Binaural Beats is a complete rebuild of an earlier script in our Scriptorium package, originally titled Brainwave Detune. This is a special kind of detune effect.
Usually detune is specified as a constant cents difference between two signals, but Binaural Beats detunes by a constant frequency difference. This means that the beat frequency between the signals is constant across the keyboard range.
Read MoreThis is an effect often found in new-age binaural beating meditation recordings. Folk wisdom suggests that when these frequencies are perceived by the brain within binaural audio, the brain becomes entrained by the frequencies and enters a similar resonant pattern itself, thus putting the listener into a desired mental state. There is absolutely no medical or scientific evidence for this.
In Brainwave Detune we offered a few fixed Brainwave choices, but in the remarkable Binaural Beats II update you can now dial in an exact Hertz value for the Detune amount. Note that for the Hz values to be absolutely correct you need to be playing in A440 equal temperament, although the effect will work in any tuning.
Typical areas of interest are:
Delta, 0.5 to 4 Hz. This is region of your brainwave resonance when you are extremely relaxed or in a very deep sleep.
Theta, 4-8 Hz. This region of frequencies is displayed when you are in deep meditation or thought.
Alpha, 8-12 Hz. A relaxed but alert state of mind.
Beta 13-20 Hz. Highly alert or perhaps agitated mind.
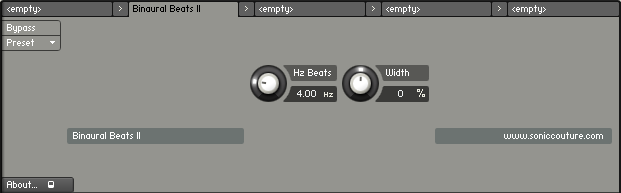
The Width control pans the signals out in the stereo image. For truly binaural beats, they should be panned 100%, but often the effect is more obvious in mono (0%). It is a rather subtle effect if you don’t already know what you’re listening for.
Oddly enough, traditional Balinese gamelan is detuned in the same way, that is with a constant beat frequency between instruments (and octaves). Typically Balinese tuners aim for a beat frequency of between 6 to 8 Hz, which they liken to a shiny or glimmering effect on the music.
DOWNLOAD:
Works with Kontakt 4.2.4 or later.
Close CloseScriptorium : Multiscripts & Key Split
Scriptorium : Multiscripts & Key Split
By Dan Powell | 14.12.2013
This is the first post in our KSP series that involves a Multi script, so I thought I’d take the time here to explain briefly what a Multi script is and how it’s different from the Instrument scripts we’ve been dealing with so far.
Read MoreThe main, perhaps obvious, difference is that Multi scripts are loaded and saved with a Multi, whereas Instrument scripts are loaded and saved within an Instrument. But this also means that they are able to do and access slightly different things. An Instrument script has access to the synthesis engine within the Instrument itself, you can adjust filters and so on. A Multi has none of that, because it lives on a higher level of the structure. It doesn’t really “know” what Instruments are within it, and is only able to adjust incoming MIDI data itself. But this is useful for some functions that are not so convenient to do within an Instrument.
It’s very important to remember that you cannot use a Multi script as an Instrument script, nor vice versa. They will each only work if in their proper location. Multi scripts have the same extension as Instrument scripts (.NKP) which sometimes adds to the confusion, so be sure you know what type of script you’re dealing with before you try to install it.
Multi scripts also need to be in a different directory than Instrument scripts, they live here:
/ Documents / Native Instruments / Kontakt 4 / presets / multiscripts /
Once you’ve downloaded a new Multiscript from somewhere, drop it into that folder and re-start Kontakt. You then need to open the Multiscript window by clicking on the little “paper scroll” icon at the top right of the Kontakt window.
Then using the Preset menu on the far left, you can then choose Presets from the “user” submenu, which will list everything you’ve put in your “multiscripts” folder.
KEYBOARD SPLIT
We’ve had several emails requesting this function, so here’s our version of a handy Multi script.
Sometimes it’s convenient to have one sound on the upper part of your keyboard and a completely different sound on the lower part. Live players often need this kind of feature, and many controller keyboards have this functionality built in. If you don’t have a controller keyboard that can do it, it can be a bit tedious to edit all your Instruments to the range you want, and also to transpose them how you need, etc.
Multi scripting is ideal for this kind of job. All the script does is check the incoming note, if it’s above the split point it’s routed to one MIDI channel, if it’s below the split point it’s routed to another. This means you can have two Instruments loaded in Kontakt, on different MIDI channels, and arrange these as you like on the keyboard.
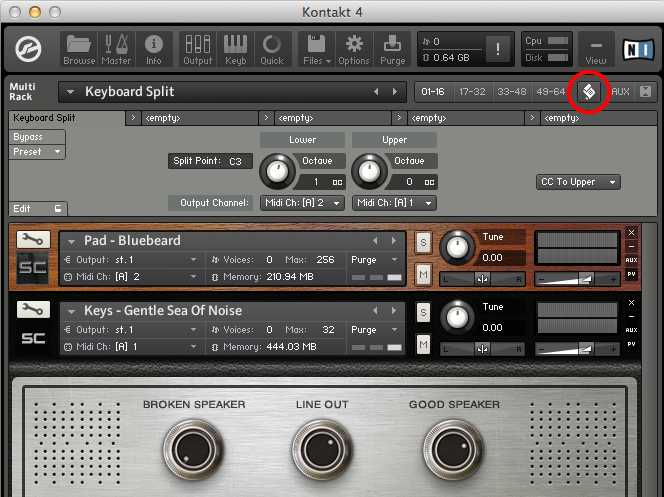
You’ll notice in the screen grab that you can adjust the split point (default middle C). You can also shift the octave of the upper and lower sections of the keyboard, which is handy for getting each sound in the desired range. I’ve layered a Broken Wurli lead type sound with a Novachord Pad in the above example, and for my purposes I wanted to play the Novachord an octave up from my left hand’s input, so I set the left knob to +1.
Controllers (Mod Wheel, Aftertouch, Pitch Bend, etc) are by definition “channel wide”, so you can’t route these based on an input pitch. The last menu on the right allows you to choose one of three options for the controllers. They can be routed to the Upper or Lower Instrument, or both.
If you save a multi, the settings of this script will be saved with the multi. But remember that this script is not saved with the Instruments included in the multi at all.
I’ve left this script unlocked, so curious users can have a look at how it works, and edit it if they like. It’s conceivable, for example, to edit this script so that each individual note could be set to any output note and MIDI channel, thus allowing you to build large Multi drum kits from many Kontakt Instruments. I may do that in a future example.
Close Close